Why do real estate photos get dark?Dark real estate photos can significantly reduce a property’s appeal and make spaces feel less inviting.
Understanding the main causes behind this issue is essential for capturing bright, balanced, and professional-looking images.
Here are four key reasons why real estate photos often turn out too dark.
Poor natural light
Insufficient natural light is one of the main reasons real estate photos look dark. Rooms with small windows, heavy curtains, or unfavorable shooting times can limit the amount of daylight entering the space, resulting in shadowy and uninviting images.
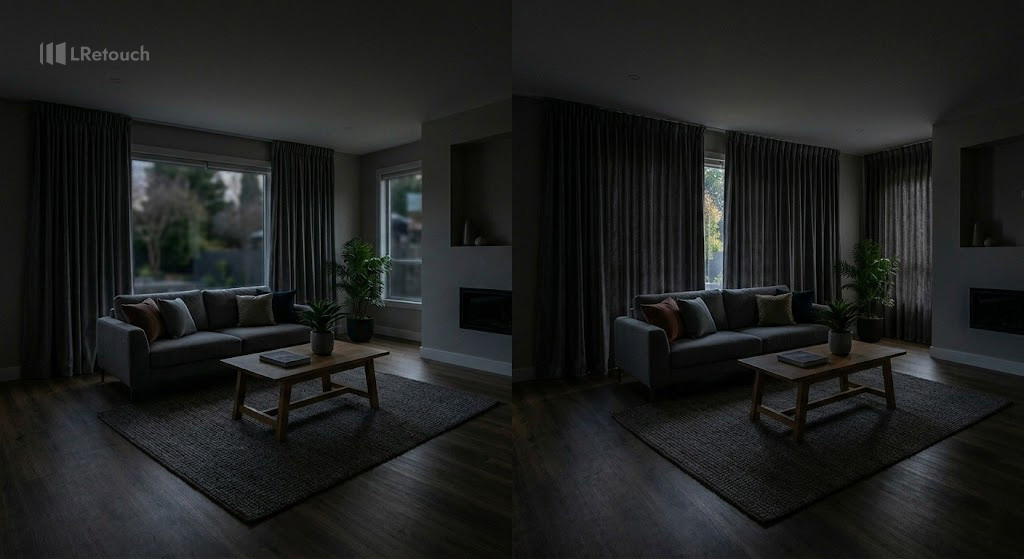
real estate photo with poor natural light causing dark interior
Incorrect camera settings
Using improper camera settings, such as low exposure, fast shutter speed, or low ISO, can lead to underexposed photos. Without the right balance, images fail to capture the true brightness and detail of the property.
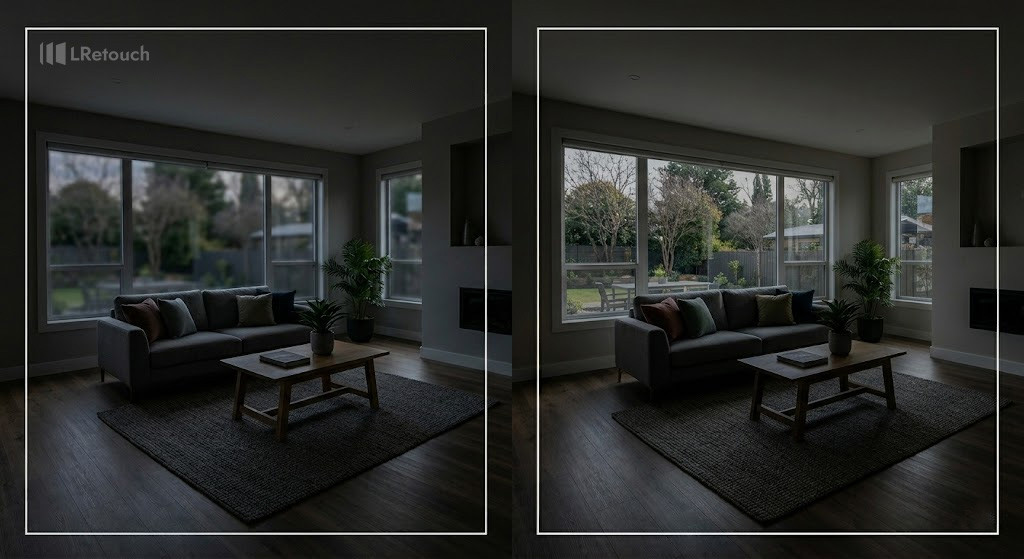
underexposed real estate photo due to incorrect camera settings
High contrast
High contrast between bright outdoor light and darker interiors can make it difficult to expose a photo correctly. Cameras often struggle to balance both areas, causing interiors to appear too dark while windows may look overexposed.
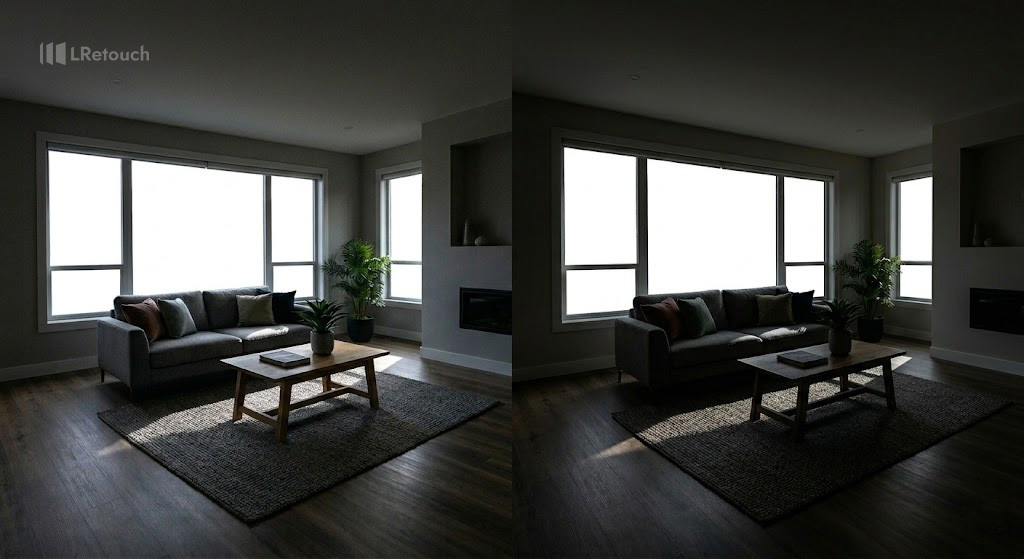
high contrast real estate photo dark interior bright window
No HDR
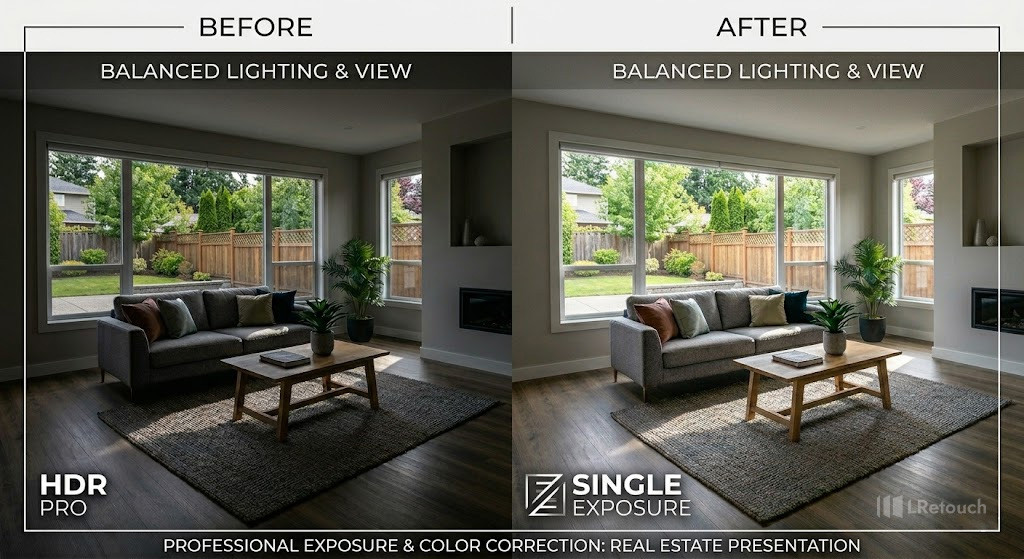
Failing to use HDR (High Dynamic Range) is a common cause of dark real estate images. When comparing HDR vs single exposure, relying on just one shot often results in lost detail in both shadows and highlights, making the photo look flat, unbalanced, and poorly lit.

HDR vs single exposure real estate photo comparison
How to fix dark real estate photos?
Dark real estate photos can reduce a listing’s impact by hiding key features. Also, it can make spaces feel smaller or less inviting. Fixing this issue requires a combination of proper shooting techniques and thoughtful editing.
By applying dark house photos fixes, you can create brighter, more balanced, and professional-looking images that attract buyers.
Exposure correction real estate
Begin with accurate exposure correction to ensure the overall image is neither too dark nor overexposed. This involves adjusting exposure, whites, and blacks to bring out details while maintaining a natural look. Proper exposure sets the foundation for all other edits and ensures the image reflects the true lighting of the space.
exposure correction real estate photo before and after
Balance shadows and highlights
Balancing shadows and highlights is crucial for recovering lost details. Increasing shadow levels can reveal darker areas such as corners and furniture, while reducing highlights prevents bright spots like windows or light fixtures from appearing blown out. The goal is to achieve a smooth transition between light and dark areas without creating a flat image.
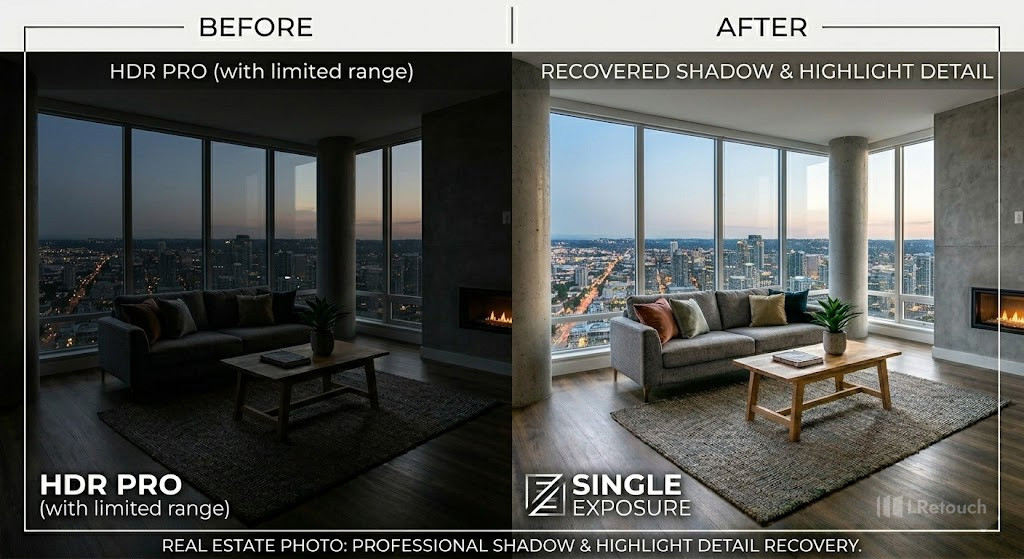
shadow and highlight balance real estate photo
Do photo brightness editing
Brighten property images should be applied selectively rather than globally. Use localized adjustments to brighten specific areas, such as hallways or ceilings, while keeping other parts natural. Over-brightening the entire image can wash out textures, so maintaining depth and dimension is key to a realistic result.
Use flash
Using flash during the shoot helps add controlled light to darker spaces. Bounced flash techniques, where light is reflected off ceilings or walls, can create soft, even illumination without harsh shadows. This method enhances detail and color accuracy while maintaining a natural interior lighting feel.
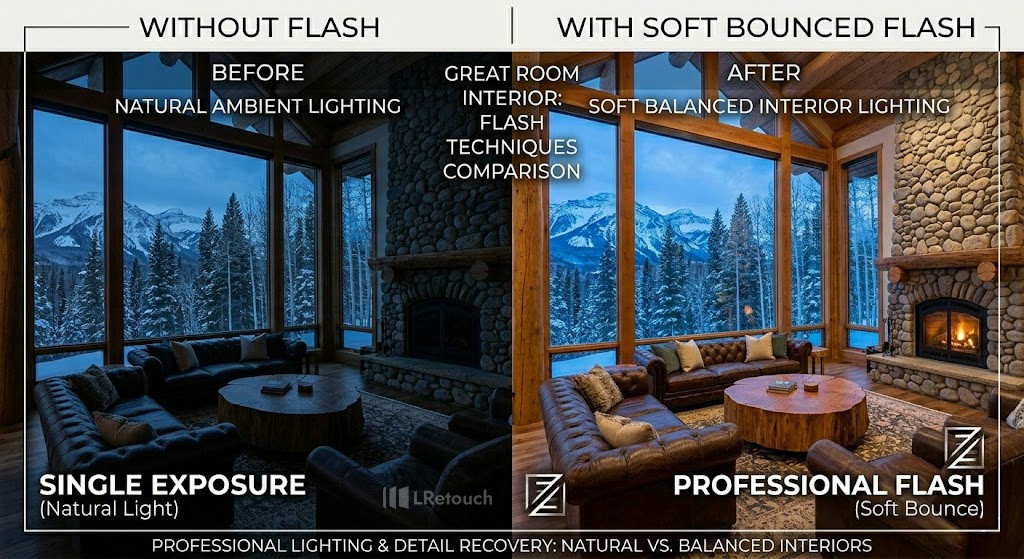
real estate photo using flash lighting for brighter interior
Blend HDR
HDR blending combines multiple exposures to capture a full range of light. By merging darker and brighter shots, you can preserve details in both shadows and highlights. When done correctly, HDR creates a balanced image that mimics how the human eye perceives a scene. Avoid the unnatural look of overly processed photos.
Optimize contrast and clarity
Adjusting contrast and clarity enhances the definition of edges, textures, and architectural features. Increasing contrast slightly can add depth, while clarity helps sharpen details like wood grain or tile patterns. However, these adjustments should remain subtle to avoid creating an overly harsh or artificial appearance.
You can learn more in the How to enhance real estate photos professionally?
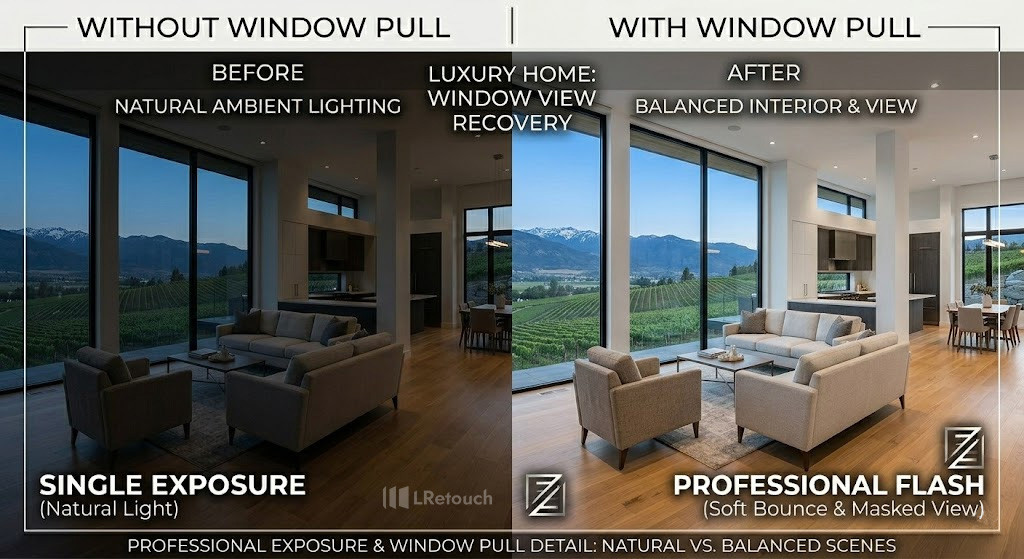
Adjust the window light and view
Windows are often the brightest parts of a photo and require special attention. Adjust exposure and masking techniques to balance interior lighting with the outdoor view, ensuring neither is overpowered. A well-edited window view adds depth and realism, making the space feel brighter and more connected to the outside environment.
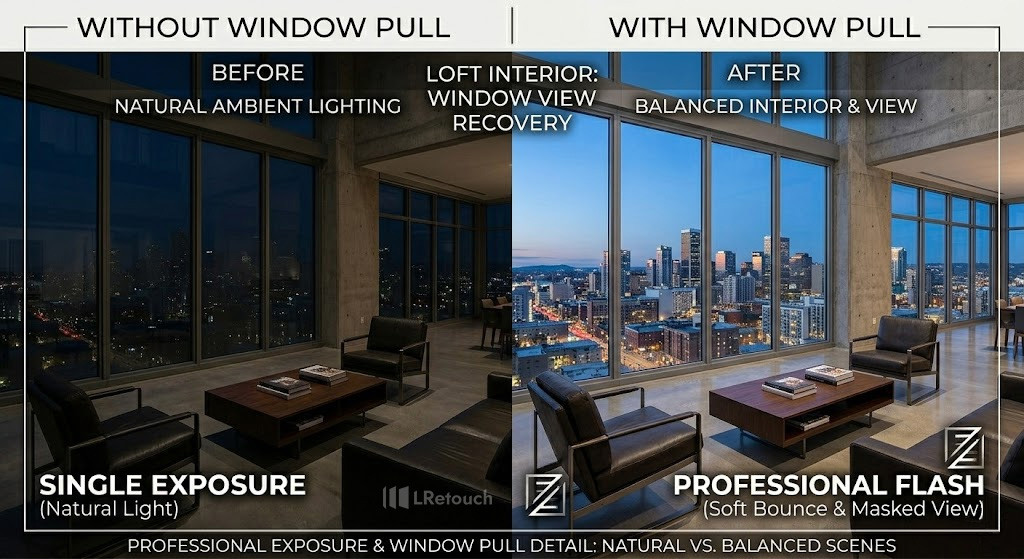
window pull real estate photo editing example
Tips to prevent real estate photography mistakes
Shooting dark property images is just one of the common real estate photo mistakes.
Avoiding listing photo mistakes requires a thoughtful approach from preparation to post-processing. Small oversights can make a property look less appealing, reduce buyer interest, and even impact perceived value.
By recognizing and preventing common issues, photographers and agents can create more professional, engaging listings that stand out in a competitive market.
- Prepare the property by decluttering, cleaning, and staging each room
- Shoot during optimal daylight hours to maximize natural lighting
- Use a tripod to ensure stability and proper alignment
- Keep the camera level to avoid distorted vertical lines
- Adjust camera settings (ISO, aperture, shutter speed) for correct exposure
- Take multiple shots and bracket exposures for better editing flexibility
- Use flash or additional lighting to balance dark areas
- Focus on strong composition to highlight space and key features
- Avoid including personal or sensitive items in the frame
- Apply subtle, realistic post-processing for brightness, color, and clarity
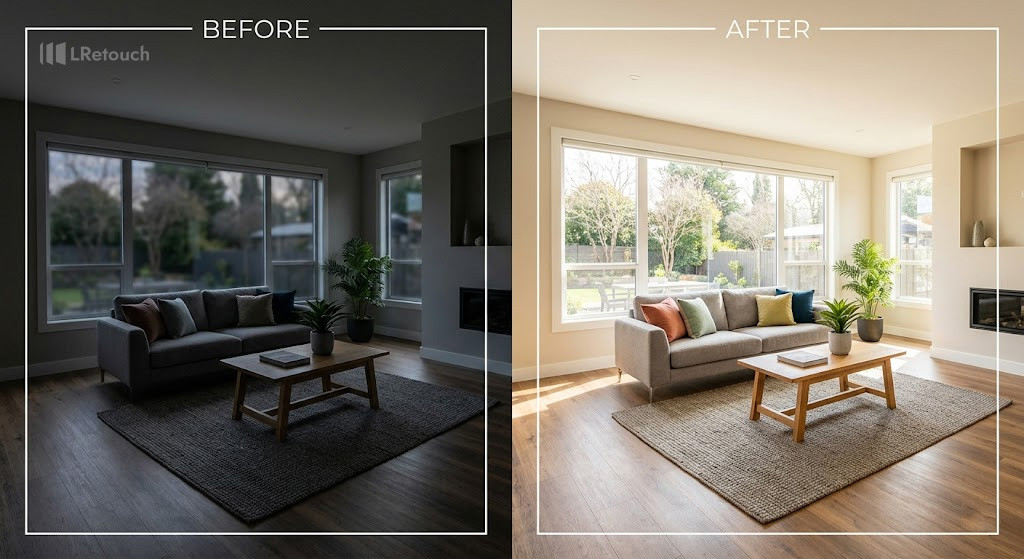
Final thoughts
professional real estate photo bright and balanced interior
By applying the right techniques and consistent editing practices, you can transform dull images into bright, professional visuals that attract buyers and enhance listings. It is easier than ever to fix dark real estate photos.